 Save to Pinterest
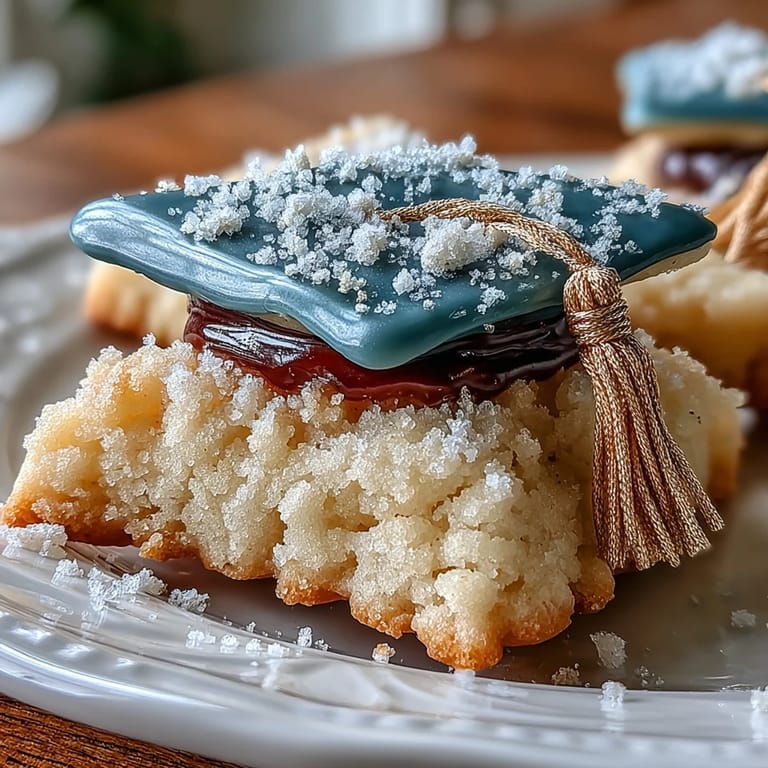
 The aroma of freshly baked cookies takes on new meaning when you’re piping gold ribbons onto a batch destined for a graduation party. My kitchen always feels a bit electric when I’m decorating these diploma and cap cookies—the anticipation mixes with a sparkle of edible gold dust, and suddenly ordinary sugar cookies become a celebration in their own right.
I’ll never forget piping the very first row of black-tasseled graduation caps for my cousin’s backyard commencement picnic, with sunlight glinting off tiny gold accents as kids darted in and out, waiting eagerly for just one more cookie before the speeches began.
Ingredients
- All-purpose flour: Gives the cookies their essential structure—always spoon and level for consistent results.
- Unsalted butter: Soft, high-quality butter creams up beautifully and ensures every bite is rich and tender.
- Granulated sugar: Just the right amount to let the buttery vanilla flavors shine without going overboard.
- Egg: Binding and adding structure, room temperature eggs make the dough easier to handle.
- Pure vanilla extract: Deepens the aroma—don’t skimp on the real stuff, it genuinely lifts the whole cookie.
- Almond extract (optional): A subtle, nutty note that always gets compliments—try swapping for lemon on a whim.
- Salt: Even in sweet treats, a pinch of salt sharpens all the flavors so they don’t fall flat.
- Powdered sugar: The backbone of flawless royal icing—always sift to avoid lumps in your piping bag.
- Egg whites (or meringue powder): The secret to that glossy, pipeable royal icing; meringue powder is great for worry-free decorating with kids.
- Cream of tartar: Stabilizes the icing so your intricate designs keep their shape.
- Vanilla extract (for icing): Adds a whisper of sweetness and rounds out the icing flavor perfectly.
- Black gel food coloring: For those crisp, classic graduation caps—start with a little and add more for deep color.
- Gold edible luster dust: Turns an ordinary treat into a showstopper—mix with clear alcohol or lemon extract for metallic pops.
Tired of Takeout? 🥡
Get 10 meals you can make faster than delivery arrives. Seriously.
One email. No spam. Unsubscribe anytime.
Instructions
- Cream and blend:
- Beat butter and sugar until pale and fluffy in a large bowl, letting the mixer do the work as the scent builds. Add the egg, vanilla, and almond extract, scraping down the bowl as needed to keep everything even.
- Mix in the flour:
- Gradually incorporate your flour and salt, watching the dough come together softly—stop mixing just as the last streaks disappear.
- Chill the dough:
- Split the dough, form each into a disc, wrap tightly, and chill for 45 minutes; it’s easier to handle, and the flavor deepens.
- Roll and cut:
- Preheat oven and dust your surface generously—roll dough to 1/4 inch thick, cutting out as many diploma and cap shapes as you can before gathering up scraps.
- Bake to perfection:
- Transfer shapes to lined sheets and bake just until the edges show a hint of gold. Let them cool on racks so they don’t soften as they set.
- Prepare royal icing:
- Whip egg whites until frothy, then beat in the powdered sugar and cream of tartar until stiff and glossy. Stir in vanilla, and divide: tint some black, leave some white, and reserve a bit for gold use.
- Decorate with color:
- With cookies fully cool, outline and flood the diploma and cap shapes, layering crisp lines and details. Leave to set for about an hour in a draft-free spot for best results.
- Add the gold accents:
- Mix luster dust with a touch of clear spirit until you have ‘edible paint,’ then use a fine brush to gild tassels and diploma ribbons; let dry completely before stacking or serving.
 Save to Pinterest
 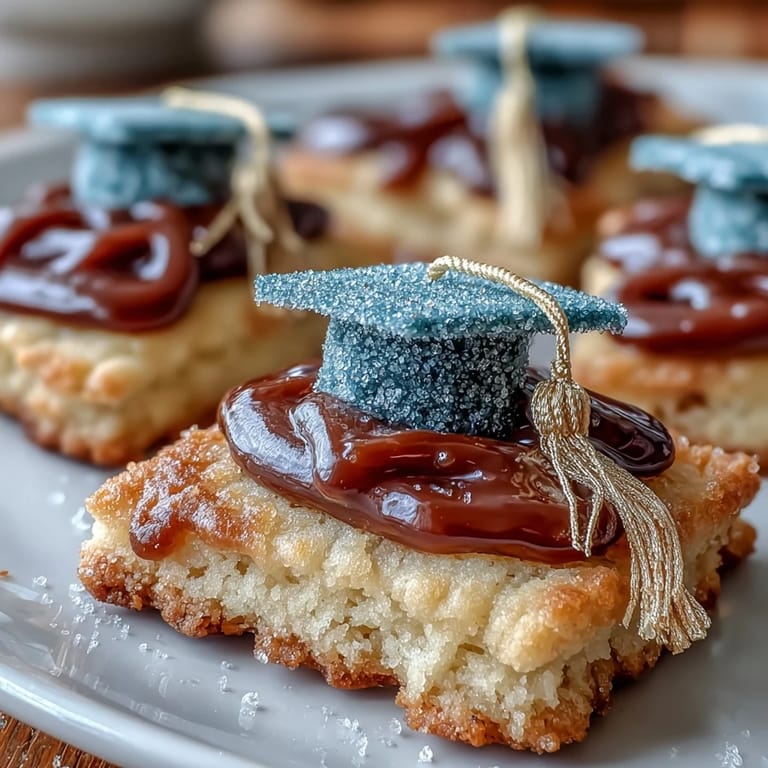 Save to Pinterest
 The first time I brought a tin of these to an outdoor graduation, I overheard a grandmother marvel at how the gold shimmered in the sunlight—right then, it felt less like a treat and more like a rite of passage.
Choosing and Using Your Tools
A sturdy rolling pin gives you even, level cookies every time, so invest in one with good heft. Use sharp-edged cutters for crisp shapes, and don’t skip a food-safe brush for those tiny, gleaming finishing touches.
Decorating Without Stress
If your icing feels too thick or thin, adjust with tiny amounts of water or sugar until you hit the perfect consistency—it only takes a drop or two. Practice piping on parchment first if you’re nervous, and remember, most mistakes can be disguised with a touch of extra gold or a creative squiggle.
Planning Ahead for Success
Because the cookies store so well, I often make them ahead in stages: bake one day, decorate the next, and paint on gold right before packing them up.
- Store undecorated cookies in airtight containers to keep them fresh and crisp.
- Royal icing needs a firm set, so leave decorated cookies undisturbed overnight if possible.
- Transport cookies in single layers with parchment in between to avoid smudges and chips.
 Save to Pinterest
 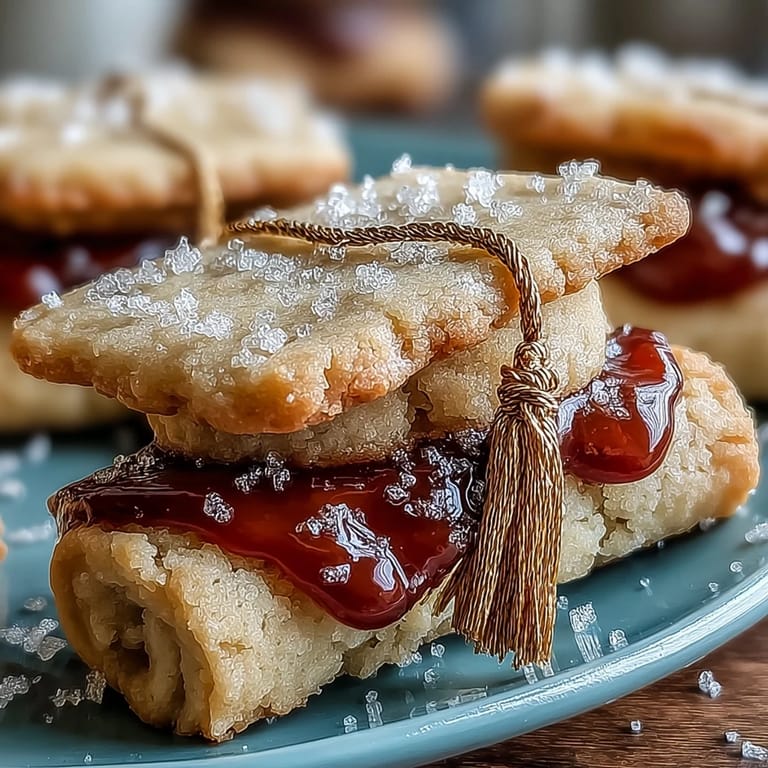 Save to Pinterest
 Whether you’re marking an academic triumph or just in it for the fun of painting with edible gold, these cookies bring a dash of sparkle to any celebration.
Recipe Questions & Answers
- → How long should I chill the dough and why?
Chill the dough about 45 minutes to firm the butter and relax gluten; this prevents spreading and helps the shapes hold crisp edges during baking.
- → What consistency should royal icing be for piping and flooding?
Use a thicker, pipeable consistency (stiff peaks) for outlines and fine details, and a slightly loosened flood consistency for filling shapes — adjust with a few drops of water until it flows smoothly but holds color.
- → Can I use meringue powder instead of egg whites for the icing?
Yes. Substitute meringue powder per package directions (often 4 tbsp + 6 tbsp water for two egg whites) to achieve similar structure while improving shelf stability and food-safety for larger batches.
- → How do I apply gold luster dust without wrecking the icing?
Mix gold luster dust with a small amount of clear alcohol or lemon extract to make a paint; apply with a fine food-safe brush after the icing has set to avoid dissolving the flood surface.
- → What is the best way to store the finished cookies?
Store completely dry cookies in an airtight container at room temperature up to one week, separating layers with parchment to protect delicate decorations.
- → Any tips for getting clean cap and diploma shapes?
Roll to an even 1/4-inch thickness, chill the dough before cutting, and press cutters straight down without twisting. Transfer cut shapes to the sheet using a thin spatula to keep edges intact.